

PT 6: 2024 Garage Build – Concrete
Now we are on to the exciting part!
Choosing a Contractor
In 2008 when my dads shop was built, the concrete work was done by a classmate of mine from high school, Barbare’s Concrete. When shopping around for concrete, this was one of my first calls. I did not realize it at the time, but Barbare’s didn’t traditionally do slab-on-grade pours, they mostly stuck with driveway work, and made an exception at the time. The father, Ron, has since retired and sold the company to his son-in-law Eric, who I don’t know.
Eric was willing to look at the work, but after reviewing, decided it wasn’t something he was comfortable doing. Enter Pat, Ron brother. Pat also has a concrete company, named Barbare’s, that has been operated separately from Ron’s for many years. Pat has concentrated on commercial contracts for large residential developments, which have included slab pours. They were upfront about not being super experienced at large slab pours, but felt they could execute regardless. Pat, and his son Daniel, were chosen to pour my slab.
This was convenient from a trust perspective, due to the family connection, as well as a logistics connection, since they live only 2 miles up the road.
It was at this stage we decided to modify the plan and only place the stem wall on the front edge of the slab. This would reduce the labor (and cost) of the pour, and make it easier to get the equipment on and off the slab after finishing. This also ended up setting the interior height once and for all. With no stem wall, the ceiling height would be 12′ 6″ (double top plate, double bottom plate, plus 12′ stud).
Slab Plan
This is the drawing that I compiled for the concrete crew, showing all of the required details and the layout of the slab, including dimensions I added for placement of the embedded hooks. I used the lumber drawing and not the slab drawing for this, for reasons I cannot explain.
Slab Design
I debated what mix to go with for the slab pretty much up until pour day. In the Plans, I had specified 3500psi with fiber, no rebar, plus some thickened areas for the lift pads.

After consulting with Daniel and Pat, I was convinced to change the recipe. On their experience and recommendation, I decided to add rebar on 24″ centers, increase to 4000psi mix, add Super8 (A “plasticiser”), and omit the fiber.
Between increasing the mix strength, and reducing the water content (made possible through the plasticiser), the concrete guys felt the fiber was not worth the cost, and also recommended against it based on finished appearance, saying it can cause issues if the concrete is ground to facilitate epoxy.
I was convinced to add the rebar as a better replacement for the fiber. I did omit rebar in a few key zones, which I will show later.
Footings
After about a 30 day wait for weather and scheduling, my job was up starting on 12 Aug 2024. The work was scheduled to take 3 days – 2 days of prep plus pour day (14Aug2024). I scheduled the inspector to come 13Aug2024 in advance.

Barbare’s subcontracted digging the footing, as they don’t own a mini-ex, and the operator who arrived was professional and experienced. It took only about 2 hours from start to finish!
The first step when arriving at the Jobsite was to put the corner boards in place. Working off of the existing house and using a laser + string, the crew laid out corner “fences” about 16″ outside of the anticipated corners. Using these stakes, they were able to accurately and quickly pull string lines to mark out where to dig the footers.

Up against the house, a corner fence was not possible, so they used masonry nails to attach the string directly to the brick. In this photo, you can also see the foundation depth behind the current garage. Where the power company ran the feeder incorrectly, it impacted soil compaction here and we had to go EXTRA deep to get to solid soil. in this side of the slab, there are ares approaching 3′ deep.

Looking from the corner, you can see how they use the corner boards to set the strings, and then use the string to guide digging the footer.

With the foundation dug, the concrete crew started to build the forms. This was done using all 100% new lumber, with stakes and reinforcements hammered into the soil. As it turns out, concrete is HEAVY and they have to build very strong forms when they are high off the ground like this.

With the crew building forms, Daniel jumped on the skidsteer and began to clear the area of organic materials. In addition to scraping the top, he is also chamfering the edges of the turndowns and leveling the surface one final time.

Using the dirt from his leveling, Daniel thought to pack the driveway edge with additional soil in an attempt to protect the existing concrete from the truck traffic over the next few days. This worked, kinda. The driveway was already torn up from the initial tree clearing, so I was not really worried about it. I plan to replace a good portion of the driveway once the construction is complete. In either case, this was a nice gesture by the contractor, which kept it from getting noticeably worse. By using the driveway, we avoided using a pump truck or georgia buggies, which allowed us to optimize the mix and saved those costs – In a rare example of better and cheaper.

This shot shows the depth of the footer where Duke had previously disturbed the soil. You can also see the construction of the forms where the slab will be above grade, and how closely the top of the form aligns with the string. Note how the slab abuts to the existing house. To support the 2×6 wall behind, the slab sticks out past the edge 5.5″, forming an inside corner. Inside corners on concrete are notorious for cracks, so we will see how this turns out over the years.

From the window of my house, the size and scope of this job is becoming apparent.

The last part of the foundation had to be dug by hand. We all took turns digging here, scooping the dirt into the skid steer bucket to be carted away. I expected the red brick here to stop below the soil, but it carried on all the way down to the foundation concrete. This ended up being much deeper than anyone guessed. Note the single form board here in the front, where the grade is much closer to slab height than in the back.

The last step on day 1 was to spread gravel within the slab footprint. Before spreading any gravel, the crew used a compactor to ensure the soil was solid where it may have been disturbed by the skid steer. This also served to level everything out one more time.

In this photo, the compacting is complete but we haven’t begun to spread gravel yet. I included this photo to show the footer detail bump-out, which is a 42″x42″ additional block located where the beam is supported on the back wall. There is a similar detail on the front wall.

With the soil compacted, Daniel began to spread gravel within the slab. He ended up using almost 2 truckloads of 57stone.

This step is where the details for extra thickness around the interior wall and lift supports began to emerge. You can also see the crew starting to form the stem wall at the front edge of the slab.

After spreading the gravel and forming the extra thickness areas, everything was compacted using the plate compactor. I am GLAD it wasn’t my job to push that thing around all afternoon!

This whole time, we were still taking turns hand digging up against the house. Finally, after dark, we were able to reach the bottom. The crew had taken a break for dinner, and I misunderstood that they were done for the day, so I poured termite treatment in the hole, making it muddy and gross.

This is what I used for termite prevention liquid throughout the whole slab. I mixed this up in 5 gallon buckets with tap water and spread it in the footer, as well as spraying it over the stone in the center of the slab using a backpack sprayer. I used all of both bottles, plus a partial bottle that I already had in stock.

Here is the last photo from Day 1 of work. I include this to make note of Daniel, who was the job superintendent. He busted his toe the day before work started, and had to get stitches. His foot wouldn’t fit into his work boot anymore, so he did the whole job in safety sandals. He was the first one on the Job Site and the last one to leave, every day. Can’t ask for more from a contractor.

As the sun rose on Day 2, I took an overhead shot. This photo shows the excavation in the front for the beam column support. It didn’t have to be formed out like the back, since the grade was higher.

Job 1 for the day was to spread out the vapor barrier plastic.

Job 2 was to drill the foundation for rebar. This detail ties the old foundation and new foundation together, permanently.

The holes are drilled with a SDS drill, then compressed air is used to extract all the dust, before injecting the epoxy and driving the rebar home.

Every other hole got a full 20′ stick, which was inserted and epoxied in place, then bent over to extend out into the slab to ensure maximum integrity. Offcuts were used in the other holes, sticking up to be short of the surface.

After passing the corner, full sticks were still bent over to enter the turn-down part of the slab to tie everything together.

Other members of the crew were finishing the forms for the stem wall along the front. Carpenters, stone masons, machine operators, and finishers – this crew was multi-talented.

Rebar was laid out long-ways, with a couple feet of overlap between sticks

Rebar-chairs are used to hold the bar in the center of the slab. These are oft-overlooked when pouring using mesh, and sometimes even with actual rebar. I was not going to forget them though!

Off-Cuts of rebar are used to form grids within the reinforcement footers for the beam-columns. Even these get rebar chairs.

At this point, the crew got called away for the remainder of the day. Another crew was working a job that went bad, and they asked for help to get it fixed before the concrete cured. Apparently this happens sometimes with concrete crews. Once the concrete is on the ground, its gotta get done right, or its a BIG problem to do it again.
This was a bit of a problem, since I needed to get the inspector to pass the foundation before the pour, which was scheduled for the next morning. It ended up being OK, as all of the required work was complete.
I had the inspector scheduled for the day, and about lunch time I hadn’t heard anything so I called. I am glad that I did, as the inspector wasn’t planning to come to my job. Since I called, and explained my situation as a homeowner, he prioritized my work and came to do the inspection. I would learn this as the job progressed – the tactic is to schedule the inspection a few days out, then call the inspector the day of (the inspector is assigned day-of, if you look the previous day you may see a different name) and let them know you are a homeowner, who took the day off work to conduct the inspection. This will get them to prioritize your job and they have been very kind to me with the whole process.
The inspector’s name was Joseph LeFrancois and he passed the inspection with no concerns. He did not even speak about the addition of rebar, I suspect that increasing the amount of rebar is unusual and a non-issue from their perspective.
I caught my wife hiding talismans within the pour at the end of day 2. Good luck charms, like hiding a coin under the mast of a ship!

Pour Day
The big day had finally arrived – 14Aug2024. We started early at 0600 laying out the remaining rebar.

I tried to setup a timelapse camera to record the pour. I got great time lapse of the first 2 hours, then nothing. I was pretty upset with this once I found out, but alas, this was a once in a lifetime activity, so no do-overs. Looking at this photo, I can identify the problem… The power switch is off on the battery.

Once all the rebar was laid out, I went around with a can of spray paint and marked where I wanted to cut out grids to make installing my lift(s) easier. I wanted to keep rebar out of the immediate area where I was planning to SDS Drill in the anchors for the lift. I have heard horror stories from people installing 11 of the 12 lift bolts, then getting to the last one and hitting rebar!

Then I went around with my battery grinder and cut the bars out to make the pattern I wanted.
NOTE: Where are the rebar chairs?!?

The first truck was scheduled for 0900, and we were still not prepared. I am running around wire-tying rebar like a madman, and the crew is still laying out bar. Of course I am the most stressed, these pros were not concerned at all.
As the truck was pulling up. I ran around taking as many photos as I could of anything and everything.


As the concrete truck was backing into position, the crew was still laying bar.
This photo also shows the brand new magnesium screed they purchased for this job, 16′ long. This was to help get the slab as flat as feasible.

The truck was on schedule, and the driver was able to skillfully back behind the forms to get the chute into the back corner.

Finally, it was time to let the mud flow!
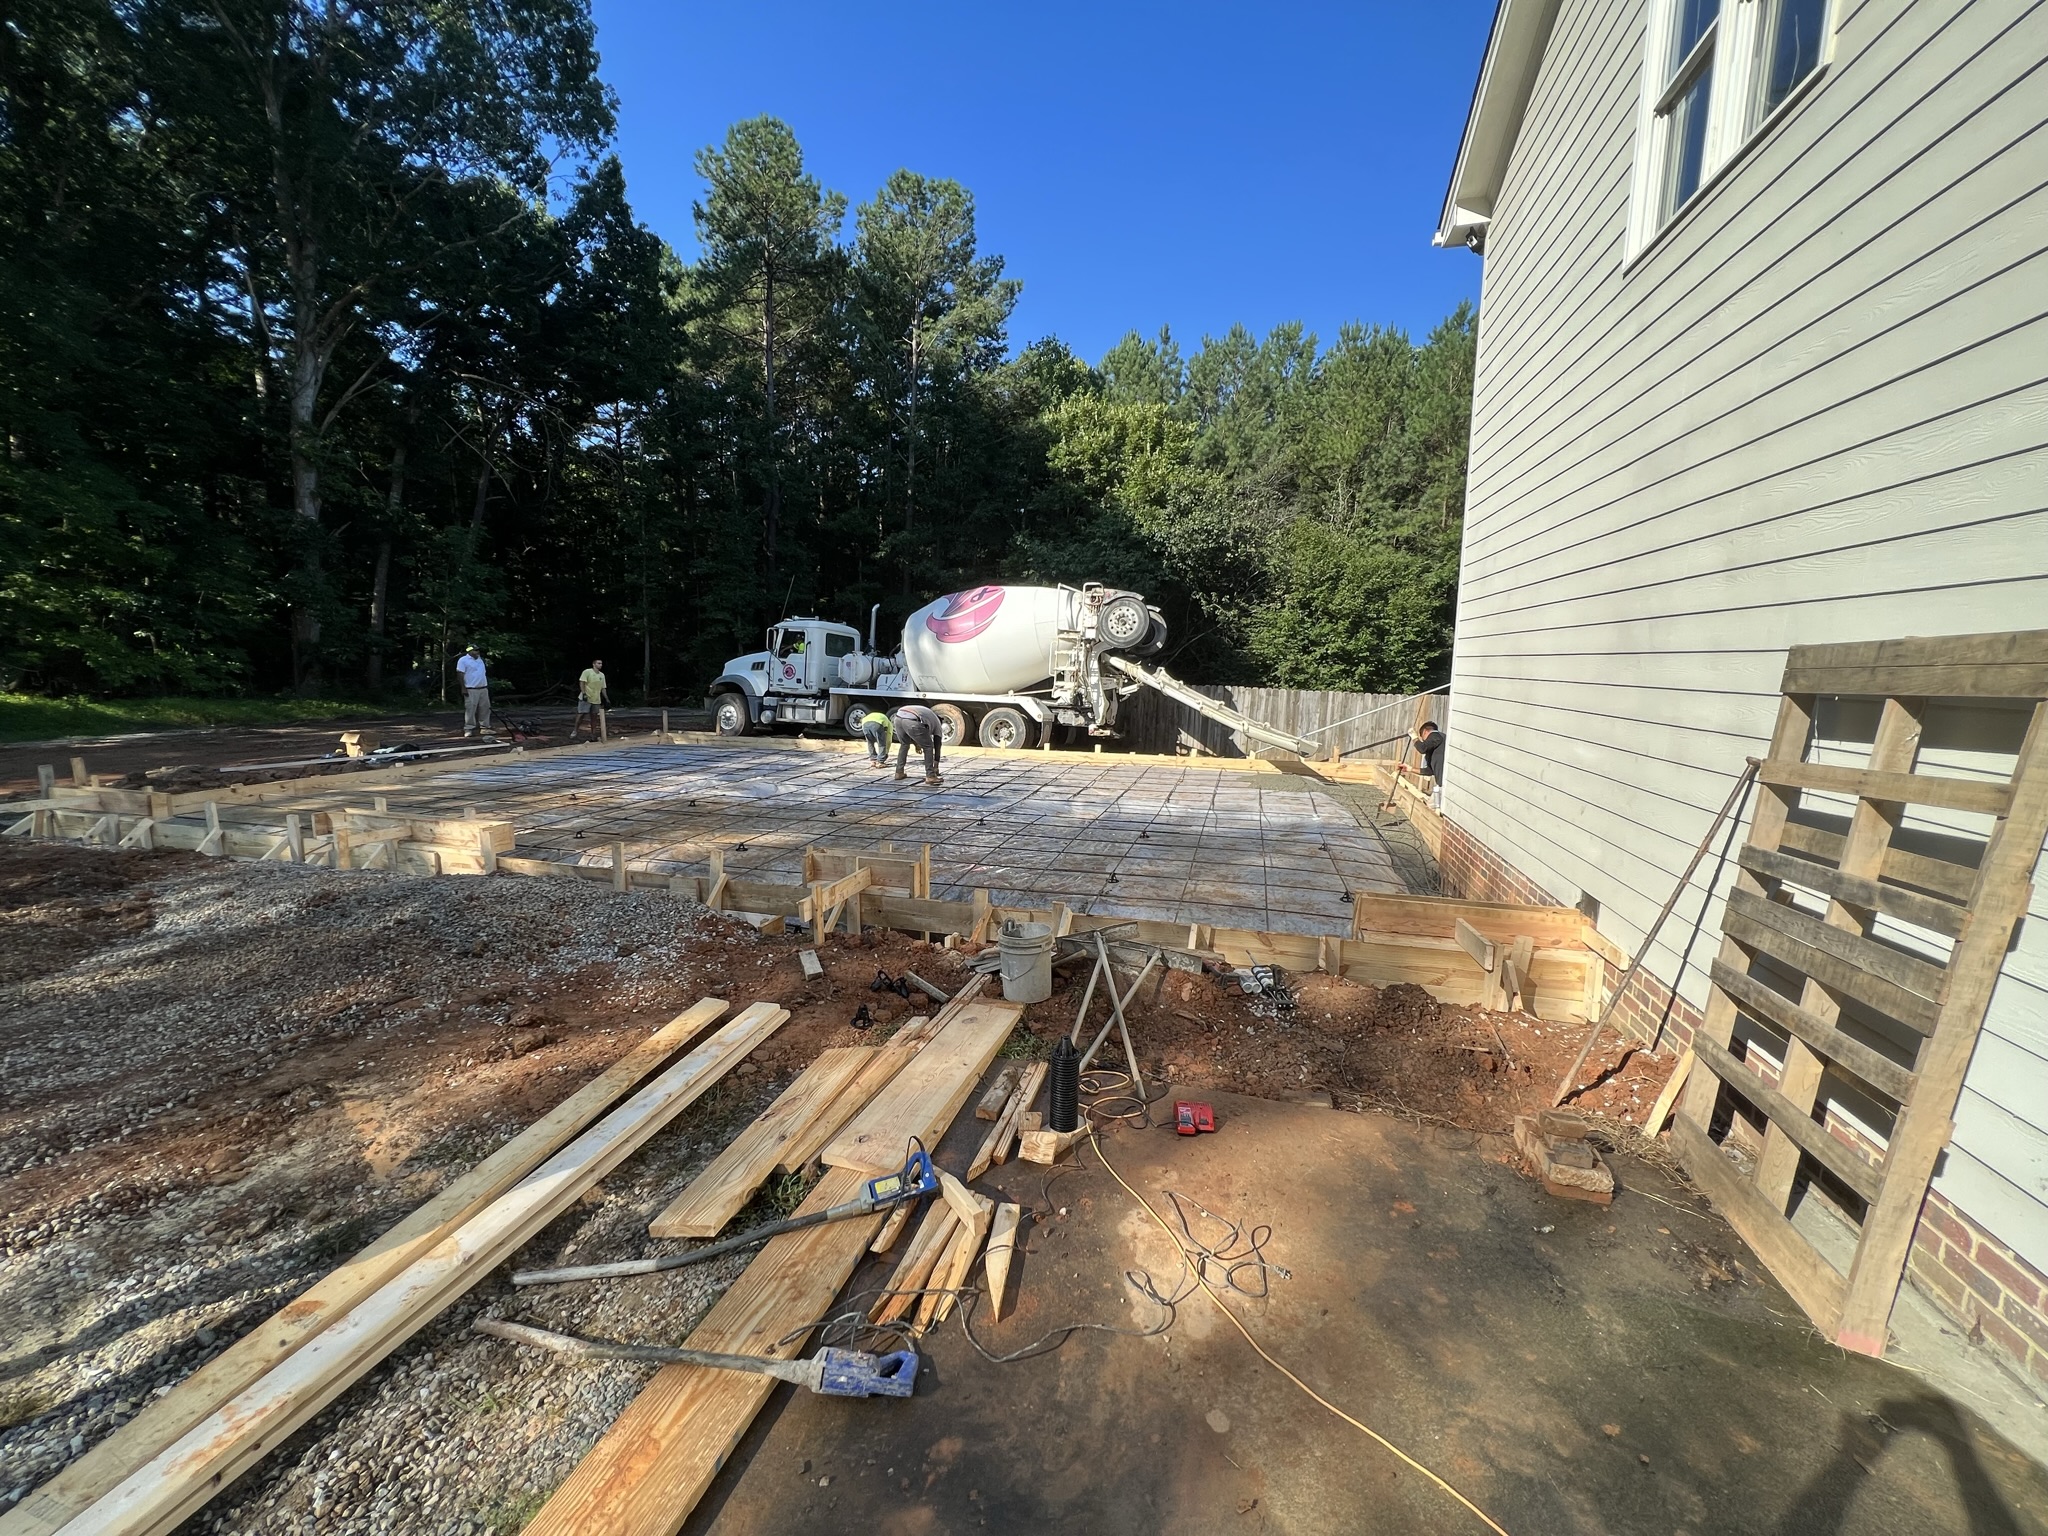
The first truck moved around alot, in order to fill the foundation trench. The crew indicated this was best practice as the depth caused it to cure at a different rate than the thinner areas on top. They also used a vibration tool to shake air out of the mix and get it to settle more into the forms.

Each truck came with 10 yards. The first truck is back in the corner doing its “washout”, and the crew is placing chairs and taking a quick break while the second truck backs down the driveway. Over 10 yards of concrete into the footings on this slab. If google is correct, thats 35,000 lbs of rock and mud.

The second truck finished the front corner of the footer, then started to fill in the middle areas for the lift.

With the footings filled, it was time to start spreading mud across the top. The guys all put on their rubber boots and jumped in. Everyone had done this before and knew exactly what to do. I didn’t realize the choreography that went into this. From the moment the first mud hits the ground, everything is on a clock. You have to get the mud placed before it starts to cook off. Once the chemical reaction starts, there are some specific times within the window where you need to be screeding, placing imbedded bolts, and start finishing.

This was the end of the third truck

Any concrete that escapes the forms is a problem. Not only is this wasted money and volume, it may get in the way in the future. This was the worst wastage I could find on this job, so very good form work!

They started off the 4th truck with filling in the stem wall forms, then moved it to the side to finish off the main part of the slab.

One member of the crew was assigned to float the concrete from the first part of the pour. Using a “bull float”, he pushed and pulled the aluminum across the top of the concrete to draw the mud to the top and gently push the aggregate down to give a nice, smooth finish.

The 4th truck provided the majority of the concrete for the 3rd bay area. They used the magnesium screed to “pull” the mud towards the truck, trying to get the level even all the way across.

The 4th truck had enough mud to finish the job. There ended up being just a touch too much in the forms, so excess was scooped out into the bucket of the skid steer. I wish I had had some other stuff pre-formed, there was plenty excess to pour the slabs for my mini-splits, compressor, a walkpath for my trailer, or anything really, but I just was not prepared.

Because of the shade on this half of the slab, the cure process took a bit longer, and gave the crew time for a break to eat and hydrate. We went through a case of water and a couple packs of gatorade over the 3 days, I tried to make sure they were taken care of.

The 5th truck turned up at this time, but unfortunately we had no use for it. In these cases, the concrete company has to eat the cost. I don’t know the cost of each truck, but I’m sure it wasn’t cheap. I wish that had not happened to them. Or, alternatively, I wish we had had the people or time to make more forms and use it, because I will defiintely need more concrete in the future. It just wasn’t in the cards.

The 4th truck left the site around 1200. The job looks almost done, but in reality its FAR from done at this point.

While the crew was having a break, I floated in all 42 tie-downs. There are 36 around the perimeter, and 8 in the interior wall. We also installed 2′ sections of rebar in the stem walls for extra reinforcement. This is a rare action-shot of me working, which means my wife took this photo.

The stem wall bolts were the first to install (after the rebar sticks), and were easiest to do because they were directly into a formed area. The surface of the concrete when complete will be mostly hidden by the base plate, so the cost of an error here was a bit lower.

Overhead shot of the full pour as they are getting the power trowel out. The guy with the yellow shirt is fixing a minor defect around the stem wall form.

After about an hour, the concrete was cured enough to walk on (carefully), but still pliable enough to hammer in the embed bolts down the middle. This was all about experience to know when to do this. I was able to carefully walk along the surface and mark where to place them, pull a string, and gently wiggle them in, filling the void with some extra mud that spilled out.

The guy on the left is asking for a water bottle. The cut a hole in the cap and spray the concrete where they are working to keep it lubricated and cool. This is the part of the process that is all about experience.

After about 2 hours, the concrete was cured enough to remove the forms from the stem wall. This allowed more “visual” finishing of the corners to be completed, as well as our first look at how the concrete filled in within the forms.
At this stage, the top surface of the concrete is still soft and captures footprints. These only sink 1/4″ or so down to the top of the aggregate that has been pushed down by the power trowel. This is the perfect time to put your “signature” in the slab.

Two more hours of power-troweling to burnish in the surface were required before the concrete finally cured hard. Near the end of this process, the crew not running the trowels were able to start removing the forms. All of the forms were first-use lumber, so they saved as much as possible to reuse on future jobs.

The last step for the crew was cutting the joints. This was done with a chalk line and a wheeled concrete saw. I did not get any photos of this process, sadly. I did decide the layout plan, going with 3 sections front-back and 4 sections left-right, ending up with the joints running out of each door opening. This avoided crashing the saw into the stem wall and the embedded bolts.

The last step for me was to setup my sprinkler. Keeping the top surface wet for the next 2 weeks was a running joke in the neighborhood – “Why is Chris watering his concrete, but not his grass?”. I was impressed at the capacity of my well system, as it was able to run 1 sprinkler almost 24/7 without any issues with the water pressure. I only had to keep a close eye on my sediment filter, as it required almost daily cleaning.
Watering the concrete keeps the top surface from curing quicker, and slows the overall cure of the concrete. The slower the concrete cures, the harder it becomes and the less likely it is to surface crack due to differential cure rates within the slab. This is particularly important on thick slabs with plastic underneath like mine.

The final cost for this work was 20,000
The concrete team demobilized the next day, cleaning up all of their equipment and lumber. Daniel stayed an extra day with the skidsteer to finish cleaning up the area, removing the dirt protecting the driveway, and backfilling soil/stone up to the edge of the slab.
22 Comments
Comments are closed.